DTF transfers on dark fabrics open a world of bold, color-rich options for designers and hobbyists. The result is vibrant color that stays true on deep base tones, provided you start with smart artwork and the right materials. To ensure consistency, pay attention to alignment, pre-press, and the essential heat press settings for dark fabrics. A white underbase helps prevent color drift and keeps edges sharp, especially on busy designs. When you’re ready to move to production, test swatches and confirm curing times for DTF on dark garments before full runs.
In other words, digital transfer film techniques for deep-colored garments require precise white underbase and controlled heat application. DTF printing on dark shirts can be described as color-rich transfer printing for opaque dark fabrics. Alternatively, you might think of this as a contemporary garment imprinting workflow where pigment layers are built up to resist fading. DTF on dark fabrics follows the same design and curing principles, though the settings may differ for opacity and fabric texture. The overarching goal is reliable color fidelity, durable adhesion, and easy care across runs.
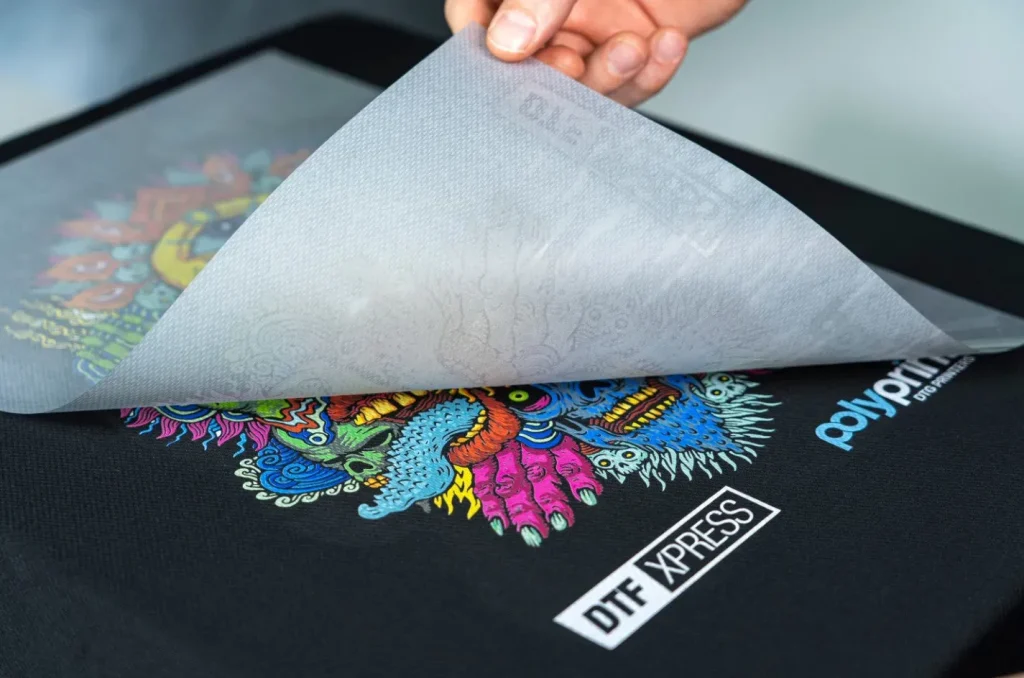
DTF transfers on dark fabrics: Designing for vibrant results
Designing for dark fabrics starts with a solid white underbase. DTF transfers on dark fabrics rely on opacity to keep colors bright and true, so plan artwork with full coverage and high contrast to counteract the garment color.
Use bold color separations and simulated realism to maximize legibility on royal blue, charcoal, or black fabrics. Test swatches on your target fabrics to gauge how the top layers interact with the underbase so you can achieve vibrant DTF transfers across the range.
DTF printing on dark shirts: White underbase, color separation, and CMYK accuracy
Printer setup and color management are critical for DTF printing on dark shirts. Calibrate your CMYK workflow and verify white underbase capabilities to ensure the whites and color layers print with consistent opacity.
Plan color layers to complement the underbase. Use dense whites and saturated hues, then test on fabric swatches to confirm color fidelity before committing to a production run.
Heat press settings for dark fabrics: consistent results and edge fidelity
A practical starting point for dark fabrics is 315-335°F (157-168°C) for 12-18 seconds with firm, even pressure. Adjust heat and dwell time based on fabric type and adhesive system, and always run a swatch test first.
Use a consistent peel method and post press to set edges. Peel warm to hot, then apply a brief second press with light pressure to improve edge adhesion and reduce edge curling on dark fabrics.
Printing materials and finishing: powders, films, and adhesives for durable DTF transfers
Powdering must be even and light to prevent whitening or specks. Choose transfer films with consistent adhesion and release properties to maintain edge sharpness and overall vibrancy.
Adhesive and film quality directly affect durability, especially on stretch or textured fabrics. A stable workflow with high-quality powders and films minimizes ghosting and ensures vibrant DTF transfers on dark fabrics.
Curing times for DTF on dark garments: care tips for longevity and color retention
Curing the transfer properly matters as much as the initial press. Let the garment cool and allow the adhesive to fully cure for 24 hours, with some systems reaching full cure by 48 hours.
Washing and care strategies matter for long term vibrancy. Turn garments inside out, use cold to warm water, and select a gentle cycle. Following curing times for DTF on dark garments helps preserve color fidelity and edge integrity over repeated washes.
Frequently Asked Questions
What are the key design considerations for DTF transfers on dark fabrics?
Design for DTF transfers on dark fabrics starts with a dense white underbase to preserve vibrancy. Plan color separations so bold hues stay distinct against dark backgrounds, and test swatches to account for different garment tones (black, charcoal, royal blue). Consider the garment type and color, and build variations to maintain legibility and contrast on dark fabrics.
How can you achieve vibrant DTF transfers on dark fabrics using heat press settings for dark fabrics?
To achieve vibrant DTF transfers on dark fabrics, start with a reliable white underbase, then add saturated color layers. Print the white underbase first and cure it evenly, then print the color layers with strong contrast. Use heat-press settings for dark fabrics around 315–335°F (157–168°C) for 12–18 seconds with firm, even pressure, peel warm, and finish with a brief second press. Always test on a swatch before production.
What are the curing times for DTF on dark garments, and how do they impact durability?
Curing times for DTF on dark garments typically require at least 24 hours before washing to allow the adhesive to fully bond; some systems reach full cure closer to 48 hours. Avoid washing during cure, and follow post-cure washing guidelines to maintain vibrancy and adhesion.
How does DTF printing on dark shirts compare to other transfer methods in terms of vibrancy and durability?
DTF printing on dark shirts generally offers richer color and better durability on a wide range of fabrics compared with vinyl or traditional screen printing. It supports versatile performance on cotton and blends, with a straightforward workflow for small runs, provided the white underbase and curing steps are properly executed.
What are common issues when applying DTF transfers on dark fabrics, and how can you troubleshoot them?
Common issues include fading colors, white underbase showing or bleeding, edges not adhering, ghosting on seams, and peeling. Troubleshoot by ensuring a dense white underbase and proper cure, verifying even powder adhesion, maintaining consistent heat and dwell time, performing thorough pre-press to flatten the garment, and adjusting film adhesion as needed.
| Aspect | Key Points |
|---|---|
| Design considerations for DTF transfers on dark fabrics |
|
| Printing process for vibrant DTF transfers on dark shirts |
|
| Pre-press and garment preparation for dark fabrics |
|
| Heat press settings and technique for dark fabrics |
|
| Curing, washing, and care to preserve vibrancy |
|
| Troubleshooting and common issues on dark fabrics |
|
| Practical tips to boost vibrancy and color fidelity |
|
| DTF printing on dark shirts vs other transfer methods |
|
Summary
Conclusion: DTF transfers on dark fabrics deliver vibrant, durable designs when you follow a careful, step-by-step process that starts with thoughtful design and a white underbase, continues through precise printing and powdering, applies correct heat-press settings, and ends with proper curing and aftercare. By understanding how to optimize each stage—from initial design considerations to washing guidance—you can consistently achieve vivid results on dark garments. Practice with swatches, test settings on different fabric tones, and refine your workflow to unlock the full potential of DTF transfers on dark fabrics. With these techniques, you’ll produce professional-quality, vibrant DTF transfers on dark fabrics that stand up to daily wear and washing while keeping colors bright and edges sharp.