DIY DTF transfers at home have transformed how crafters create professional-looking designs without the cost of a traditional print shop. This method delivers vibrant color, a soft hand-feel, and durable adhesion that withstands regular washing. If you’re wondering how to produce high-quality designs from a kitchen or craft space, you’ve landed in the right place with a practical, step-by-step approach. In this guide, you’ll learn the essential equipment, prep tips, and a practical workflow to implement the technique confidently. Whether you’re decorating tees, totes, or linens, this DIY project blends professional results with hands-on creativity and flexible customization for different fabrics and colors.
At-home film transfer is a cost-effective way to personalize garments using a direct-to-film approach that embeds bright artwork onto fabrics. Rather than outsourcing to a commercial printer, hobbyists can experiment with pigment inks, transfer film, and hot-melt powder to achieve durable, flexible designs. This method emphasizes a repeatable workflow from layout and printing to curing and heat pressing, making it accessible for beginners. Tips cover surface prep, precise alignment, and gentle post-press care to preserve color and texture across multiple washes. By embracing this home-friendly production technique, creators can grow a portfolio of custom apparel, totes, and home textiles.
DIY DTF transfers at home: A step-by-step guide to professional-looking designs
DIY DTF transfers at home let you achieve professional-looking designs without the expense of a print shop. Direct-to-film transfers deliver vibrant color, a soft hand-feel, and durable adhesion that holds up to regular wear and washing.
This step-by-step guide covers everything from equipment and preparation to a practical tutorial, so you can learn the full workflow for DIY transfers: from artwork to finished garment. You’ll see how the concept of a step-by-step DTF tutorial translates into a reliable in-home process and how this aligns with what you’ll glean about DTF printing at home.
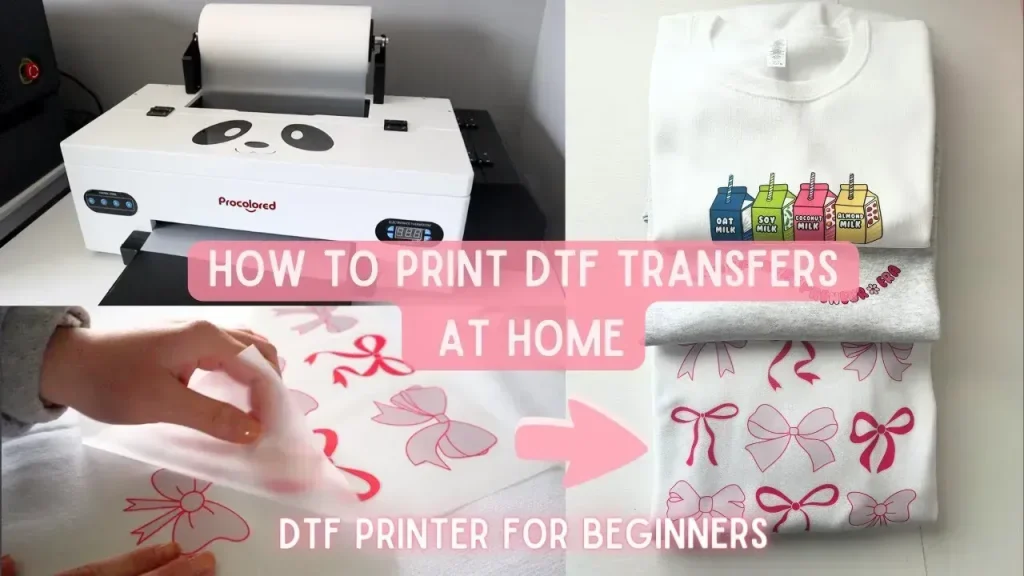
DTF printing at home: equipment, films, and powder for reliable results
DTF printing at home requires a pigment ink printer configured for DTF media, DTF transfer film, hot-melt adhesive powder, a curing device, and a reliable heat press. With the right setup you can achieve vivid images, good stretch, and strong adhesion that survives regular washing.
Selecting quality materials and calibrating color are key. Use test fabrics, maintain ICC profiles if your printer supports them, and ensure even powder distribution so results stay consistent when you apply DTF transfers.
How to apply DTF transfers: best practices for precise alignment and adhesion
How to apply DTF transfers: start with clean, pre-washed fabric and a smooth surface. Align the transfer carefully, use low-tack tape to secure edges, and double-check orientation before pressing.
During pressing, protect the design with a teflon or silicone sheet, and follow the recommended temperature and time (for example, 320–350°F for 8–20 seconds) for most fabrics. After pressing, let the garment cool briefly before peeling the carrier, and follow your supplier’s guidelines for either warm-peel or cold-peel.
Step-by-step DTF tutorial: from design to heat press
Step-by-step DTF tutorial: begin with a high-resolution design, generate a mirrored print for the film, and set up color management to maximize fidelity.
Print the mirrored image onto the DTF film using pigment inks, inspect for smudges, then dust with hot-melt powder and cure. This is followed by positioning the pressed film on fabric and executing the heat-press phase with a protective sheet.
DIY heat transfer with DTF: tips, troubleshooting, and care for lasting prints
DIY heat transfer with DTF: common issues like color bleeding, edge halos, or uneven adhesion can crop up. If you see problems, review printer calibration, powder distribution, curing temperature, and heat-press times to restore uniform results.
Care and washing instructions help extend life: turn garments inside-out, use cold water, mild detergent, and avoid bleach or fabric softeners. Keeping notes of successful settings for different fabrics will speed up future projects and improve consistency.
Frequently Asked Questions
What is DIY DTF transfers at home and why should I try it?
DIY DTF transfers at home let you print artwork with pigment inks, apply powder, cure, and heat-press the design onto fabric. This approach delivers vibrant color, soft hand-feel, and durable adhesion, with more control and lower ongoing costs than using a professional shop. The core workflow includes printing on DTF film, applying hot-melt powder, curing it, and pressing to fabric with a heat press. With practice, you can produce shirts, totes, and linens that look professional.
DTF transfers at home: is there a step-by-step DTF tutorial I can follow?
Yes—there is a step-by-step DTF tutorial you can follow for DIY DTF transfers at home. A well-structured guide walks you through design preparation, printer settings, powder application, curing, alignment, and heat pressing. Start with a simple design to learn terminology and calibrations, then move to more complex, multi-color artwork.
How to apply DTF transfers at home: a quick DIY heat transfer with DTF guide?
Here’s a quick guide for how to apply DTF transfers at home as a DIY heat transfer with DTF: pre-wash and dry the fabric, print a mirrored image, dust with adhesive powder, cure the powder, then position the transfer on the fabric. Preheat your heat press to around 320–350°F (160–177°C) and press with firm, even pressure for about 8–20 seconds, using a protective sheet. Let the garment cool and peel according to your powder/film guidelines, then perform any needed post-press corrections.
What equipment do I need for DTF printing at home?
Key equipment for DTF printing at home includes a pigment-ink printer configured for DTF media, DTF transfer film, hot-melt adhesive powder, a curing device (oven, heat tunnel, or dedicated curing tray), a heat press, a teflon or silicone sheet, a weeding tool, scissors, and basic safety gear (gloves and ventilation). You may also want a lint-free cloth and a protective mat to keep your workspace clean.
What are common issues in DIY DTF transfers at home and how can I troubleshoot them?
Common issues include fading color or poor adhesion (check printer calibration, film quality, powder distribution, and curing temperature), cracking or peeling edges (ensure even heat distribution and avoid over-pressing, verify fabric prep), white halos around the print (confirm alignment and full transfer adhesion, re-press if needed), and color bleeding into fabric fibers (use high-quality pigment inks, correct color profiles, and test on similar fabrics). Keep a log of successful settings to reproduce consistent results.
| Topic | Key Points |
|---|---|
| What is DTF and why DIY DTF transfers at home? |
|
| Equipment and materials you’ll need for DIY DTF transfers at home |
|
| Step-by-step overview |
|
| Design and printing considerations |
|
| Powder curing and heat pressing considerations |
|
| Fabric prep and transfer positioning |
|
| Post-press care and finishing |
|
| Troubleshooting common issues |
|
| Care and washing |
|
| Cost and time considerations |
|
Summary
DIY DTF transfers at home empower crafters to produce professional-looking designs with fewer barriers to entry. By understanding the workflow—from printing to powder curing and heat pressing—you can confidently create custom apparel and accessories that showcase your unique style. With ongoing practice, you’ll refine your process, reduce waste, and unlock new possibilities for DIY fashion, gifts, and business ideas. Remember to start simple, test often, and document your best settings so every project benefits from your growing expertise in DTF printing at home.